Wednesday, September 11, 2013

How to run Hive queries through Hive Web Interface.

One of the good things about Hadoop, and related projects, which I really like is the WebUI provided to us. It makes our life a lot easier. Just point your web browser to the appropriate URL and quickly perform the desired action. Be it browsing through HDFS files or glancing over HBase tables. Otherwise you need to go the shell and issue the associated commands one by one for each action [I know i'm a bit lazy ;)].

Hive is no exception and provides us a WebUI, called as Hive Web Interface, or HWI in short. But, somehow I feel it is less documented and talked about as compared to HDFS and HBase WebUI. But that doesn't make it any less useful. In fact I personally find it quite helpful. With its help you can do various operations like browsing your DB schema, see your sessions, query your tables etc. You can also see the System and User variables like Java Runtime, your OS architecture, your PATH etc etc.

OK, enough brand building. Let's get started and see how to use HWI. The process is quite simple. First a couple of things on configuration. Following are the properties which you might have to modify as per your requirements :

  • hive.hwi.listen.host : The host address the Hive Web Interface will listen on.
  • hive.hwi.listen.port : The port the Hive Web Interface will listen on.
  • hive.hwi.war.file : This is the WAR file with the jsp content for Hive Web Interface.

Values for these properties is totally your choice. I'll go ahead with the defaults.
You would probably want to setup HiveDerbyServerMode as well if you wish to allow multiple sessions at the same time.

Note : Make these changes in hive-site.xml file inside your $HIVE_HOME/conf/ directory. Create it if you don't have it already. Please don't change anything in default-site.xml file. This is important.

Now start HWI using the following command :
bin/hive --service hwi 

If everything goes fine you will see something like this on your terminal :
hive-0.10.0 miqbal1$ bin/hive --service hwi
13/09/11 00:21:46 INFO hwi.HWIServer: HWI is starting up
13/09/11 00:21:46 INFO mortbay.log: Logging to org.slf4j.impl.Log4jLoggerAdapter(org.mortbay.log) via org.mortbay.log.Slf4jLog
13/09/11 00:21:46 INFO mortbay.log: jetty-6.1.26
13/09/11 00:21:46 INFO mortbay.log: Extract /Users/miqbal1/hadoop-eco/hive-0.10.0/lib/hive-hwi-0.10.0.war to /var/folders/n3/d0ghj1ln2zl0kpd8zkz4zf04mdm1y2/T/Jetty_0_0_0_0_9999_hive.hwi.0.10.0.war__hwi__ae9cmk/webapp

13/09/11 00:21:46 INFO mortbay.log: Started SocketConnector@0.0.0.0:9999

You are good to go now. So point your web browser to HWI. For example, http://localhost:9999/hwi/index.jsp in my case, since i'm working on a local machine on my localhost with all default configuration parameters. Use the hostname and port as per your setup. This will take you to the HWI front page which will look like this :


You can click on Home if you wish to read about HWI a bit more, on Authorize to authorize a user. If you want to browse through your DB schema you can click on Browse Schema under DATABASE section. You can click on Diagnostics if you want to have a look at various System and User variables on your box. All this is merely a matter of one click. So we will move onto the main part, querying Hive tables. Follow the steps below in order to that :

  • Click on Create Session under SESSIONS section, enter some session name and hit Submit.

  • This will take you to the Manage Session screen. This is the place where all the action will take place. Come down to the Session Details section and enter a file name, say /Users/tariq/res.txt, in the Result File box. This is the file where the result of your query will get stored. If you expect your result to be very huge you can just enter /dev/null over there. Remember the result file is local to the web server. Similarly enter the error file if you wish.
  • Now come down to the Query box and write the query you want to execute.
  • Choose Yes or No for Silent Mode as per your wish. Select Yes for Start Query and hit Submit.

You should be able to see the file /Users/tariq/res.txt by now containing the result of your query. You can also view the result by clicking on View File option which will appear next to the Result File box upon the successful completion of your query.

That is it. Hope it helps. Do let me know in case of any issue.

Thursday, June 27, 2013

Visualizing Pig Queries Through Lipstick


Quite often while working with Pig you would have reached a situation wherein you found that your Pig scripts have reached such a level of complexity that the flow of execution, and it’s relation to the MapReduce jobs being executed, has become difficult to visualize. And this eventually ends up with the need of additional efforts required to develop, maintain, debug, and monitor the execution of scripts.

But not anymore. Thankfully Netflix has developed a tool that enables developers to visualize and monitor the execution of their data flows at a logical level, and they call it Lipstick. As an plementation of PigProgressNotificationListener, Lipstick piggybacks on top of all Pig scripts executed in our environment notifying a Lipstick server of job executions and periodically reporting progress as the script executes.

Lipstick has got some really cool features. For instance once you are at the Lipstick main page you can see all the Pig jobs that are currently running or have run. The following things are displayed for each job:
– User
– Job
– Start Time
– Heartbeat Time (last time a heartbeat was sent)
– Progress
             – Blue (running)
             – Green (complete)
             – Red (failed)
             – Orange (terminated)
  •  Clicking on the header (User, Job, Start Time, etc.) for a column will sort by the column (asc/desc).
  • Search by username or job name.
  • Filter jobs by progress.
  • Pagination controls (next page, show X jobs per page, etc).

Along with this there is a whole bunch of other cool stuff that Lipstick offers. You can find more on Lipstick user guide.

For a detailed overview you can visit their official blog section. And if you can't wait anymore and want to give it a try straight away, you can directly go to their repository.

Wednesday, May 1, 2013

How to install MapR M3 on Ubuntu through Ubuntu Partner Archive.

In a recent post of mine I had mentioned about the partnership between MapR and Canonical towards an initiative to make Hadoop available with Ubuntu natively through Ubuntu Partner Archive. Since, the package has been released now, I thought of showing how to get it done. Trust me it's really cool to install Hadoop by just one apt-get install :)

First things first. Open your sources.list file and add the MapR repositories into it.

deb http://package.mapr.com/releases/v2.1.2/ubuntu/ mapr optional
deb http://package.mapr.com/releases/ecosystem/ubuntu binary/

Now, update your repository.
sudo apt-get update

Note : If it throws any error regarding MapR repositories, just uncomment the lines which allow us to add software from Canonical's partner repository.

## Uncomment the following two lines to add software from #Canonical's
## 'partner' repository.
## This software is not part of Ubuntu, but is offered by #Canonical and the
## respective vendors as a service to Ubuntu users.
deb http://archive.canonical.com/ubuntu precise partner 
deb-src http://archive.canonical.com/ubuntu precise partner


Install hadoop.
sudo apt-get install mapr-single-node

1, 2, 3..and you are done. Isn't that cool?Just three easy steps and you have your brand new single node hadoop cluster in your lap. But, there are some pre-requisites and it's very important to satisfy them.

CPU : 64-bit

OS : Red Hat, CentOS, SUSE, or Ubuntu

Memory : 4 GB minimum, more in production

Disk : Raw, unformatted drives and partitions

DNS : Hostname, reaches all other nodes

Users : Common users across all nodes; Keyless ssh

Java : Must run Java

Other : NTP, Syslog, PAM


The above procedure will install following services on your machine :

CLDB : mapr-cldb

JobTracker : mapr-jobtracker

MapR Control Server : mapr-webserver

MapR Data Platform : mapr-fileserver

Metrics : mapr-metrics

NFS : mapr-nfs

TaskTracker : mapr-tasktracker

ZooKeeper : mapr-zookeeper

In order to install other hadoop projects and for further documentation you can visit the official documentation here.

I hope you found this post helpful, and as always comments and suggestions are welcome.


Friday, April 26, 2013

Hadoop Herd : When to use What...


8 years ago not even Doug Cutting would have thought that the tool which he's naming after the name of his kid's soft toy would so soon become a rage and change the way people and organizations look at their data. Today Hadoop and BigData have almost become synonyms to each other. But Hadoop is not just Hadoop now. Over the time it has evolved into one big herd of various tools, each meant to serve a different purpose. But glued together they give you a powerpacked combo.

Having said that, one must be careful while choosing these tools for their specific use case as one size doesn't fit all. What is working for someone might not be that productive for you. So, here I am trying to show you which tool should be picked in which scenario. It's not a big comparative study but a short intro to some very useful tools. And, I am really not an expert or an authority so there is always some scope of suggestions. Please feel free to comment or suggest if you have any. I would love to hear from you. Let's get started :

1- Hadoop : Hadoop is basically 2 things, a distributed file system(HDFS) which constitutes Hadoop's storage layer and a distributed computation framework(MapReduce) which constitutes the processing layer. You should go for Hadoop if your data is very huge and you have offline, batch processing kinda needs. Hadoop is not suitable for real time stuff. You setup a Hadoop cluster on a group of commodity machines connected together over a network(called as a cluster). You then store huge amounts of data into the HDFS and process this data by writing MapReduce programs(or jobs). Being distributed, HDFS is spread across all the machines in a cluster and MapReduce processes this scattered data locally by going to each machine, so that you don't have to relocate this gigantic amount of data.

2- Hbase : Hbase is a distributed, scalable, big data store, modelled after Google's BigTable. It stores data as key/value pairs. It's basically a database, a NoSQL database and like any other database it's biggest advantage is that it provides you random read/write capabilities. As I have mentioned earlier, Hadoop is not very good for your real time needs, so you can use Hbase to serve that purpose. If you have some data which you want to access real time, you could store it in Hbase. Hbase has got it's own set of very good API which could be used to push/pull the data. Not only this, Hbase can be seamlessly integrated with MapReduce so that you can do bulk operation, like indexing, analytics etc etc.

Tip : You could use Hadoop as the repository for your static data and Hbase as the datastore which will hold data that is probably gonna change over time after some processing.

3- Hive : Originally developed by Facebook, Hive is basically a data warehouse. It sits on top of your Hadoop cluster and provides you an SQL like interface to the data stored in your Hadoop cluster. You can then write SQLish queries using Hive's query language, called as HiveQL and perform operations like store, select, join, and much more. It makes processing a lot easier as you don't have to do lengthy, tedious coding. Write simple Hive queries and get the results. Isn't that cool??RDBMS folks will definitely love it. Simply map HDFS files to Hive tables and start querying the data. Not only this, you could map Hbase tables as well, and operate on that data.

Tip : Use Hive when you have warehousing needs and you are good at SQL and don't want to write MapReduce jobs. One important point though, Hive queries get converted into a corresponding MapReduce job under the hood which runs on your cluster and gives you the result. Hive does the trick for you. But each and every problem cannot be solved using HiveQL. Sometimes, if you need really fine grained and complex processing you might have to take MapReduce's shelter.

4- Pig : Pig is a dataflow language that allows you to process enormous amounts of data very easily and quickly by repeatedly transforming it in steps. It basically has 2 parts, the Pig Interpreter and the language, PigLatin. Pig was originally developed at Yahoo and they use it extensively. Like Hive, PigLatin queries also get converted into a MapReduce job and give you the result. You can use Pig for data stored both in HDFS and Hbase very conveniently. Just like Hive, Pig is also really efficient at what it is meant to do. It saves a lot of your effort and time by allowing you to not write MapReduce programs and do the operation through straightforward Pig queries.

Tip : Use Pig when you want to do a lot of transformations on your data and don't want to take the pain of writing MapReduce jobs.

5- SqoopSqoop is a tool that allows you to transfer data between relational databases and Hadoop. It supports incremental loads of a single table or a free form SQL query as well as saved jobs which can be run multiple times to import updates made to a database since the last import. Not only this, imports can also be used to populate tables in Hive or HBase. Along with this Sqoop also allows you to export the data back into the relational database from the cluster.

Tip : Use Sqoop when you have lots of legacy data and you want it to be stored and processed over your Hadoop cluster or when you want to incrementally add the data to your existing storage.

6- Oozie : Now you have everything in place and want to do the processing but find it crazy to start the jobs and manage the workflow manually all the time. Specially in the cases when it is required to chain multiple MapReduce jobs together to achieve a goal. You would like to have some way to automate all this. No worries, Oozie comes to the rescue. It is a scalable, reliable and extensible workflow scheduler system. You just define your workflows(which are Directed Acyclical Graphs) once and rest is taken care by Oozie. You can schedule MapReduce jobs, Pig jobs, Hive jobs, Sqoop imports and even your Java programs using Oozie.

Tip : Use Oozie when you have a lot of jobs to run and want some efficient way to automate everything based on some time (frequency) and data availabilty.

7- Flume/Chukwa : Both Flume and Chukwa are data aggregation tools and allow you to aggregate data in an efficient, reliable and distributed manner. You can pick data from some place and dump it into your cluster. Since you are handling BigData, it makes more sense to do it in a distributed and parallel fashion which both these tools are very good at. You just have to define your flows and feed them to these tools and rest of things will be done automatically by them.

Tip : Go for Flume/Chukwa when you have to aggregate huge amounts of data into your Hadoop environment in a distributed and parallel manner.

8- Avro : Avro is a data serialization system. It provides functionalities similar to systems like Protocol Buffers, Thrift etc. In addition to that it provides some other significant features like rich data structures, a compact, fast, binary data format, a container file to store persistent data, RPC mechanism and pretty simple dynamic languages integration. And the best part is that Avro can easily be used with MapReduce, Hive and Pig. Avro uses JSON for defining data types.

Tip : Use Avro when you want to serialize your BigData with good flexibility.


The list is actually pretty big, but I have covered only the most significant tools. Over time if I feel like something else should be mentioned here I would definitely do that. Comments and suggestions are welcome.

Sunday, April 21, 2013

Hadoop+Ubuntu : The Big Fat Wedding.

Now, here is a treat for all you Hadoop and Ubuntu lovers. Last month, Canonical, the organization behind the Ubuntu operating system, partnered with MapR, one of the Hadoop heavyweights, in an effort to make Hadoop available as an integrated part of Ubuntu through its repositories. The partnership announced that MapR's M3 Edition for Apache Hadoop will be packaged and made available for download as an integrated part of the Ubuntu operating system. Canonical and MapR are also working to develop a Juju Charm that can be used by OpenStack and other customers to easily deploy MapR into their environments.

The free MapR M3 Edition includes HBase, Pig, Hive, Mahout, Cascading, Sqoop, Flume and other Hadoop-related components for unlimited production use. MapR M3 will be bundled with Ubuntu 12.04 LTS and 12.10 via the Ubuntu Partner Archive. MapR also announced that the source code for the component packages of the MapR Distribution for Apache Hadoop is now publicly available on GitHub.

MapR is the only distribution that enables Linux applications and commands to access data directly in the cluster via the NFS interface that is available with all MapR Editions. The MapR M5 and M7 Editions for Apache Hadoop, which provide enterprise-grade features for HBase and Hadoop such as mirroring, snapshots, NFS HA and data placement control, will also be certified for Ubuntu.

Now, as you get Hadoop integrated natively with Ubuntu, it's a lot easier to install it and go. No more unnecessary downloads and wacky configuration steps. And the best part is the NFS interface available with MapR's distribution that enables other Linux commands and application to access the cluster data directly. The Ubuntu/MapR package will be available through the Ubuntu Partner Archive for 12.04 LTS and 12.10 releases of Ubuntu on the official website starting from April 25, 2013.

For more info you can get the Ubuntu and Hadoop: the perfect match white paper from here.

Monday, April 15, 2013

Is your data really Big(Data)??

The advent of so many noticeable tools and technologies for handling BigData problems has made the lives of a lot of people and organizations easier. A lot of these are open source, they have good support, good community and are pretty active. But there is another aspect of it. When things become easy, free, with good support and in abundance,  we often start to over-utilize them. Having said that, I would like to share one incident.

We organize Hadoop meetups here in Bangalore(India). In one of the initial meetings we just decided to exchange views with each other on how we are using Hadoop, and other related projects. There I noticed that a lot of folks were either using or planning to use Hadoop for problems which could easily be solved using traditional systems. In fact they could be solved in a much better and efficient way. There was absolutely no need to use Hadoop for these kind of problems. So, it raised question in my mind. The question was, are we really getting the 'point'. To me it seems like those folks were trying to stitch a piece of cloth using a sword.

From my experience, I have learned one thing. Even if we have the strongest of weapons we can't win a battle if we are not using it at the right spot at the right time. Same holds good for the industry. Normally we tend to use a particular 'thing' for all our needs, if we find that it had worked for us in the past. There is no harm in it. This is human tendency to try to make things swift. But this doesn't work always. Same is the case when it comes to BigData.

First of all, BigData is not an absolute term. It is rather relative. Relative to the resources that we have. For example 1PB might be big enough for me, but for an internet giant, say Google, it is still not that big. So how to decide whether the data which I am going to handle qualifies to be called BigData or not. The thumb rule is that once you cross the threshold after which you are not able to handle the data, which you have, with the help of resources and system you already have, you can assume that your data has grown into BigData. But, in the process we should always keep one thing in mind. Are we really able to exploit the resources we already have. Not to offend anyone, but I have seen it a couple of times that folks are not using their systems to the fullest and turning towards rather new, and meant for completely different systems, to solve their issues.

For instance if somebody wants to run real time ad-hoc queries over his or her 1TB data set, he or she could do it pretty efficiently using MySQL. Planning to use Hadoop or Hbase in such a situation makes no sense. Moreover it would be wastage of systems and resource, atleast in my view.

Long story short, 'think well before you act'. Analyze your data and the requirements properly and then conclude whether you are really gonna face BigData issues. Because, 'with BigData, comes big responsibilities'.

Tuesday, April 2, 2013

Happy Birthday Hadoop

Although I am a bit late, it is still worth wishing the most significant 'Computer Science Thing' I have know since I got my computer science senses. You might find me biased towards Hadoop, but I am actually helpless, when it comes to Hadoop. I started my career as a Hadoop developer so i'll always have that 'first love' kinda feeling for Hadoop.

Back in 2004, not even Dough Cutting would have thought that Hadoop will so quickly grow into one of the most powerful computing platforms, when he had started to work on a platform for distributed storage and processing, after getting inspired by those 2 great papers from Google on GFS(Google File System) and MapReduce, which he later on named 'Hadoop' after his kid's toy elephant. And here we are today.

It was mid 2006 when I had heard about Hadoop for the first time at an Open Source Conference, held here in Bangalore(India). But I never knew at that time this is that piece of technology that is going to fire a revolution in the field of computing. After that I almost forgot about all of this. But destiny had tied Hadoop with me by then.

On one fine evening of early 2007, I went to see my sister who was working on something related to distributed computing at that time. I had actually gone there to get some guidance for my final year engineering project. That was the incident that changed everything. Asking about something for myself I ended up with some insights on Hadoop. Since then I am just in love with it and still trying to learn everything about it.

I am sorry if you were expecting this post to be a technical one, like other posts of mine. This one is just about Hadoop in a totally non technical way. I remember that thread from Doug Cutting which says "Release 0.1.0 of Hadoop is now available". It was April 2nd, 2006. Who would have imagined that this 0.1.0 would so quickly turn into 2.0.0. Many thanks to the great community, all the contributors, committer, QAs QCs and everybody else who has helped Hadoop in growing so fast and thus helping people like me.

Thursday, March 21, 2013

MapReduce jobs running through Eclipse don't appear in the JobTracker Web UI at 50030

Hello all,

      In response to an earlier post of mine, that shows how to run a MapReduce job through Eclipse IDE, I quite frequently receive comments that the users are not able to see the status of their MapReduce job, which they are currently running, on the JobTracker Web UI.

The trick is very simple. Just add the following 2 lines in your code where you are doing all the configuration. Something like this :


Configuration conf = new Configuration();
conf.set("fs.default.name", "hdfs://localhost:9000");
conf.set("mapred.job.tracker", "localhost:9001");

This should do the trick for you. After doing this just point your web browser to the JobTracker Web UI at localhost:50030.

**Modify the hostname and port address as per your configuration.

To know about Hadoop configuration and setup you can go to this link. It shows the entire process in detail.

HTH

Friday, February 15, 2013

Unable To Connect Your Phone In VirtualBox Through USB Cable??

Recently I came to know about the Premium Suite For Samsung Galaxy Note. And being a proud owner of this great device it was quite obvious that I wanted to take the pleasure of this. So, I thought of upgrading my phone through Samsung Kies. But I have been working of Linux since last couple of years, so got kinda stuck as Kies doesn't come for Linux. So, I installed Oracle VirtualBox on my Ubuntu Box and installed Windows 8 in it. After that I quickly installed Kies in it. But, to my surprise I was not able to connect my phone. After some diagnosis I found the error message shown below :


Failed to access the USB subsystem. VirtualBox is not currently allowed to access USB devices. You can change this by adding your user to the 'vboxusers' group. Please see the user manual for a more detailed explanation.

And the detail message was :


NS_ERROR_FAILURE (0x00004005)
Component: 
Host
Interface: 
IHost {dab4a2b8-c735-4f08-94fc-9bec84182e2f}
Callee: 
IMachine {5eaa9319-62fc-4b0a-843c-0cb1940f8a91}

If you are also facing something similar, don't worry. There is simple one line workaround for this problem. But before that let me put one thing. This is not a problem with VirtualBox. You just have to add the current user to the vboxusers group. Issue the following command to do this :
sudo usermod -aG vboxusers <your username>

*Replace <your username> with your user.

Do not forget  to log off and back in to finalize the change in permissions. After logging in restart your VM, open Kies, plug-in your phone and you are good to go.

Monday, February 4, 2013

HOW TO BENCHMARK HBASE USING YCSB

YCSB (Yahoo Cloud Serving Benchmark) is a popular tool for evaluating the performance of different key-value and cloud serving stores. You can use it to test the read/write performance of your Hbase cluster and trust me it's very effective. In this post i'll show you how to build and use YCSB for your particular version of Hbase. So, this is just about setting up and using YCSB and not about YCSB itself. For detailed info on YCSB you can go to the below specified links :

1- Github-YCSB page : https://github.com/brianfrankcooper/YCSB
2- The paper from ACM Symposium on Cloud Computing, "Benchmarking Cloud Serving Systems with YCSB" : http://research.yahoo.com/files/ycsb.pdf

So, let us get started...

Step1- Clone the YCSB git repository :

apache@hadoop:~$ git clone http://github.com/brianfrankcooper/YCSB.git

This will create a directory caleed YCSB inside your current directory. (It might take some time depending on your internet connection speed. So, be patient)

Step2- Go inside this newly created YCSB directory and move inside the hbase directory. You will find an xml file here named as pom.xml. Open this pom.xml file and edit it so that it looks like this :

<?xml version="1.0" encoding="UTF-8"?>
<project xmlns="http://maven.apache.org/POM/4.0.0" xmlns:xsi="http://www.w3.org/2001/XMLSchema-instance" xsi:schemaLocation="http://maven.apache.org/POM/4.0.0 http://maven.apache.org/maven-v4_0_0.xsd">
  <modelVersion>4.0.0</modelVersion>
  <parent>
    <groupId>com.yahoo.ycsb</groupId>
    <artifactId>root</artifactId>
    <version>0.1.4</version>
  </parent>
  <artifactId>hbase-binding</artifactId>
  <name>HBase DB Binding</name>
  <dependencies>
    <dependency>
      <groupId>org.apache.hbase</groupId>
      <artifactId>hbase</artifactId>
      <!--<version>${hbase.version}</version>-->
      <version>0.94.4</version>
    </dependency>
    <dependency>
      <groupId>org.apache.hadoop</groupId>
      <artifactId>hadoop-core</artifactId>
      <!--<version>1.0.0</version>-->
      <version>1.0.4</version>
    </dependency>
    <dependency>
      <groupId>com.yahoo.ycsb</groupId>
      <artifactId>core</artifactId>
      <version>${project.version}</version>
    </dependency>
  </dependencies>
  <build>
    <plugins>
      <plugin>
        <groupId>org.apache.maven.plugins</groupId>
        <artifactId>maven-assembly-plugin</artifactId>
        <version>${maven.assembly.version}</version>
        <configuration>
          <descriptorRefs>
            <descriptorRef>jar-with-dependencies</descriptorRef>
          </descriptorRefs>
          <appendAssemblyId>false</appendAssemblyId>
        </configuration>
        <executions>
          <execution>
            <phase>package</phase>
            <goals>
              <goal>single</goal>
            </goals>
          </execution>
        </executions>
      </plugin>
    </plugins>
  </build>
</project>

      Pay attention to the lines in red. These are the changes that you have to make in order to build YCSB without any problem for your specific version of Hbase.

NOTE : As of this writing I am usign hadoop-1.04 and hbase-0.94.4, so I have mentioned these versions in the above shown file. You have to specify the versions which you are going to use.

Step3- Now, go back to your terminal and move inside the YCSB directory :
apache@hadoop:~$ cd YCSB

Step4- It's time to do the build now :
apache@hadoop: /YCSB/ mvn clean package
This will start the build process. You can see all the information as the build process continues. If everything goes fine then you will see something like this on your terminal :


NOTE: If multiple descriptors or descriptor-formats are provided for this project, the value of this file will be non-deterministic!
[WARNING] Replacing pre-existing project main-artifact file: /hadoop/projects/YCSB/voldemort/target/archive-tmp/voldemort-binding-0.1.4.jar
with assembly file: /hadoop/projects/YCSB/voldemort/target/voldemort-binding-0.1.4.jar
[INFO]                                                                      
[INFO] ------------------------------------------------------------------------
[INFO] Building YCSB Release Distribution Builder 0.1.4
[INFO] ------------------------------------------------------------------------
[INFO]
[INFO] --- maven-clean-plugin:2.3:clean (default-clean) @ ycsb ---
[INFO]
[INFO] --- maven-checkstyle-plugin:2.6:checkstyle (validate) @ ycsb ---
[INFO]
[INFO] --- maven-assembly-plugin:2.2.1:single (default) @ ycsb ---
[INFO] Reading assembly descriptor: src/main/assembly/distribution.xml
[INFO] Processing sources for module project: com.yahoo.ycsb:core:jar:0.1.4
[INFO] Processing sources for module project: com.yahoo.ycsb:cassandra-binding:jar:0.1.4
[INFO] Processing sources for module project: com.yahoo.ycsb:hbase-binding:jar:0.1.4
[INFO] Processing sources for module project: com.yahoo.ycsb:hypertable-binding:jar:0.1.4
[INFO] Processing sources for module project: com.yahoo.ycsb:dynamodb-binding:jar:0.1.4
[INFO] Processing sources for module project: com.yahoo.ycsb:elasticsearch-binding:jar:0.1.4
[INFO] Processing sources for module project: com.yahoo.ycsb:infinispan-binding:jar:0.1.4
[INFO] Processing sources for module project: com.yahoo.ycsb:jdbc-binding:jar:0.1.4
[INFO] Processing sources for module project: com.yahoo.ycsb:mapkeeper-binding:jar:0.1.4
[INFO] Processing sources for module project: com.yahoo.ycsb:mongodb-binding:jar:0.1.4
[INFO] Processing sources for module project: com.yahoo.ycsb:orientdb-binding:jar:0.1.4
[INFO] Processing sources for module project: com.yahoo.ycsb:redis-binding:jar:0.1.4
[INFO] Processing sources for module project: com.yahoo.ycsb:voldemort-binding:jar:0.1.4
[INFO] Processing sources for module project: com.yahoo.ycsb:ycsb:pom:0.1.4
[INFO] Building tar : /hadoop/projects/YCSB/distribution/target/ycsb-0.1.4.tar.gz
[INFO] ------------------------------------------------------------------------
[INFO] Reactor Summary:
[INFO]
[INFO] YCSB Root ......................................... SUCCESS [1.940s]
[INFO] Core YCSB ......................................... SUCCESS [23.149s]
[INFO] Cassandra DB Binding .............................. SUCCESS [7.421s]
[INFO] HBase DB Binding .................................. SUCCESS [15.638s]
[INFO] Hypertable DB Binding ............................. SUCCESS [2.805s]
[INFO] DynamoDB DB Binding ............................... SUCCESS [3.451s]
[INFO] ElasticSearch Binding ............................. SUCCESS [8.123s]
[INFO] Infinispan DB Binding ............................. SUCCESS [2:27.468s]
[INFO] JDBC DB Binding ................................... SUCCESS [18.235s]
[INFO] Mapkeeper DB Binding .............................. SUCCESS [10.011s]
[INFO] Mongo DB Binding .................................. SUCCESS [4.874s]
[INFO] OrientDB Binding .................................. SUCCESS [19.702s]
[INFO] Redis DB Binding .................................. SUCCESS [3.960s]
[INFO] Voldemort DB Binding .............................. SUCCESS [14.181s]
[INFO] YCSB Release Distribution Builder ................. SUCCESS [7.076s]
[INFO] ------------------------------------------------------------------------
[INFO] BUILD SUCCESS
[INFO] ------------------------------------------------------------------------
[INFO] Total time: 4:48.305s
[INFO] Finished at: Mon Feb 04 01:13:00 IST 2013
[INFO] Final Memory: 107M/737M
[INFO] ------------------------------------------------------------------------

This shows that the build has been completed successfully and you are all set to go. 

Step5- Step4 will create a directory named target inside your /YCSB/distribution/ directory. You will find the YCSB tar file here, ycsb-0.1.4.tar.gz in my case. Copy this file to some location of your choice and extract it. This will give you the ycsb-1.0.4 directory which contains all the important and necessary stuff.

Step6- Move inside the ycsb-1.0.4 directory where you will find a directory called /hbase-binding. Go inside the /hbase-binding and open the /lib directory situated there. Copy the following jars from your /HBASE_HOME/lib into this /lib directory :
     1-slf4j-api-*.jar
     2-slf4j-log4j12-*.jar
     3-zookeeper-*.jar

Step7- You will find another directory named /conf inside /hbase-binding. You will find an xml file here named as hbase-site.xml file. Replace this hbase-site.xml file with the habse-site.xml present in your /HBASE_HOME/conf directory.

Step8- You are all set for testing your Hbase now. Start the Hadoop and Hbase processes and go inside ycsb-1.0.4. Now, issue the following command to load test your Hbase deployment :
apache@hadoop:/ycsb-0.1.4$ bin/ycsb load hbase -P workloads/workloada -p columnfamily=f1 -p recordcount=1000000 -p threadcount=4 -s | tee -a workloada.dat

This will start the load test and after sometime it will give you the result summary. Do not get overwhelmed by the great amount of information displayed on your terminal after this operation. For our convenience we have piped this ycsb command with the Linux tee command and written the entire output information to the terminal and the workloada.dat. You will find this file inside your ycsb-0.1.4
directory which contains the same content as your terminal has. You can extract useful insights from this file(or from your terminal) like :
The overall runtime in milliseconds
Throughput i.e. operations per second
Number of operations
AverageLatency etc etc

Here are some of the lines from my terminal :
[OVERALL], RunTime(ms), 73258.0
[OVERALL], Throughput(ops/sec), 13650.386305932458
[UPDATE], Operations, 4
[UPDATE], AverageLatency(us), 530564.25
[UPDATE], MinLatency(us), 65895
[UPDATE], MaxLatency(us), 1642179

I hope you found this post helpful. Stay connected for more :)

Sunday, February 3, 2013

How to install Java 6 on Ubuntu

In one of the previous post of mine I have shown you how to install Sun(Oracle) Java on Ubuntu through its repository. This will, by default, install Java-7 on your machine as Ubuntu 12.04(and onwards) have Java-7 in their repository. But, sometimes you may come across a situation wherein you need some specific version of Java. For example, it is advisable to use Java-6 while trying to configure or use Apache Hadoop. In such a scenario you need to download the appropriate version of Java and install it manually. It is again a straightforward process. Just follow the steps below :

Note : Java-6 has been taken here, as an example, on a machine running Ubuntu 12.10

Step 1 : Download the required version of Java from the official download page. It will download  jdk-6u38-linux-x64.bin inside your Downloads directory.

Step 2 : Go to the directory where jdk was downloaded(Download here) and make it an executable file using this command :
apache@hadoop:~/Downloads$ sudo chmod +x jdk-6u38-linux-x64.bin

Step 3 : Run this executable .bin file using :
apache@hadoop:~/Downloads$ ./jdk-6u38-linux-x64.bin

Step 4 : Now move the file to the /usr/lib/jvm directory with the help of mv command :
apache@hadoop:~/Downloads$ sudo mv jdk1.6.0_38/ /usr/lib/jvm/

Step 5 : This is the step where you actually do the installation. Use the following commands to do that :
apache@hadoop:~/Downloads$ sudo update-alternatives  --install /usr/bin/javac javac /usr/lib/jvm/jdk1.6.0_38/bin/javac 1
apache@hadoop:~/Downloads$ sudo update-alternatives --install /usr/bin/java java /usr/lib/jvm/jdk1.6.0_38/bin/java 1
apache@hadoop:~/Downloads$ sudo update-alternatives --install /usr/bin/javaws javaws /usr/lib/jvm/jdk1.6.0_38/bin/javaws 1

Once you are done with these steps you are good to go. One step is actually still required though. The above procedure will just install Java-6 on your machine. In case you have multiple versions of Java installed on your machine, you need to set which version you want to use as your default Java. To do so issue the command shown below :
apache@hadoop:~/Downloads$ sudo update-alternatives --config java

This will show you all the Java versions installed on your machine. Choose the number corresponding to the version of your choice and you are all set.

Thursday, January 31, 2013

Salesforce.com's Phoenix : SQL layer for your Hbase

Ever wished to have the ability to write SQL queries for your data stored in Hbase?I know your answer is gonna be Hive. But I am talking about something which doesn't incur heavy start-up costs and which is based on native HBase APIs rather than going through the MapRreduce framework. Need not worry. Salesforce.com comes to the rescue this time. Salesforce.com has recently announced Phoenix, an SQL layer over HBase. What do I meant by that???

Phoenix is an SQL layer over HBase delivered as a client-embedded JDBC driver targeting low latency queries over HBase data. Phoenix takes our SQL query, compiles them into a series of HBase scans, and orchestrates the running of those scans to produce regular JDBC result sets. Cool..Isn't it?

Phoenix doesn't depend on MapReduce, but that doesn't mean that it doesn't believe in the philosophy of bringing computation closer to data. It very well does that, through :
      Coprocessors : To perform operations on the server-side thus minimizing client/server data transfer
      Custom filters : to prune data as close to the source as possible

And the best part is that there is no adverse effect on the performance.

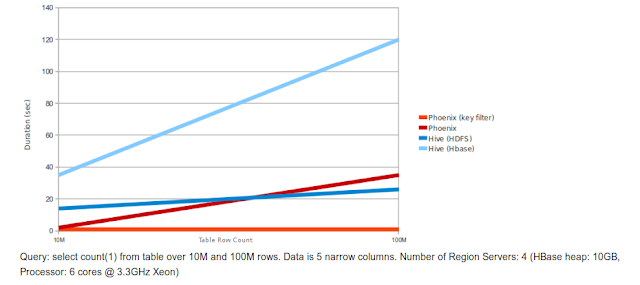
I am showing a couple a graphs below which present relative performance between Phoenix and some other related products (Courtesy : Phoenix Github page)

Phoenix vs Hive (running over HDFS and HBase)


Phoenix vs Impala (running over HBase)


The performance, as you can see from these graphs is quite good. For a detailed info you can visit this link.

Phoenix stores table metadata in an HBase table and keep it versioned, such that snapshot queries over prior versions will automatically use the correct schema. Direct use of the HBase API, along with coprocessors and custom filters, results in performance on the order of milliseconds for small queries, or seconds for tens of millions of rows.

Phoenix SQL Support

Phoenix supports all typical SQL query statement clauses, including SELECT, FROM, WHERE, GROUP BY, HAVING, ORDER BY, etc. It also supports a full set of DML commands as well as table creation and versioned incremental alterations through our DDL commands. We try to follow the SQL standards wherever possible. For a complete set of all the things which Phoenix supports you can visit the language reference page.

But, there are certain things which Phoenix doesn't support as of now. They include :
       Joins : Single table only currently.
       Derived tables : Nested queries along with TopN queries are coming soon.
       Relational operators : Union, Intersect, Minus.
       Miscellaneous built-in functions.

I don't feel it's bad considering that Phoenix has just born :)

For an in-depth info about Phoenix, you can visit Phoenix Wiki.

In the next post i'll try to write about building Phoenix with some hands-on. Stay connected till then.

Friday, January 25, 2013

Audi's Autonomous Piloted Parking : Real Life Transformers???

Ever wished to have a car which would make you feel yourself like 007. NO??? Need not worry. Soon you will be able to do that (hopefully ;) ). How?? Keep on reading...

At the Consumer Electronics Show (CES) which was held in Las Vegas few days ago Audi showed something which would definitely blow your mind. CES is considered as world’s most important electronics show. There, Audi had shown several new technological aspects and one of them is through this self-driven Audi A7 showing off the brand’s piloted parking system. It reminds of James Bond movie Tomorrow Never Dies where Bond would operate his BMW 750iL with a remote control. Here we have Annie Lien (Senior Engineer, Electronics Lab at Volkswagen Group of America), who shows us a cool demo of this awesome feature. She directs an Audi A7 using her phone and it parks itself at the Mandarin Oriental Hotel Las Vegas and on leaving hotel; she directs it off from the parking to her. They call it as Park Assist. And this what Audi has to say about its Park Assist technology :

"Audi’s automatic parking systems operate by means of either ultrasound or cameras, which display images via the onboard monitor. One   particularly convenient solution is park assist. When backing into a parking space, it performs all the necessary steering movements; it can handle both parallel parking and parking perpendicular to the street.

The system finds a parking space with ultrasound sensors that scan the roadside in two dimensions while driving at moderate speed. The system notifies the driver via a message in the display once the sensors have found a space which is large enough.

If the driver wishes to park in the space, he or she shifts into reverse and the park assist system takes over the steering. The driver must accelerate, shift gears, and brake. When parallel parking, the detected space is large enough if it is about 80 centimeters (2.62 ft) longer than the vehicle itself. Park assist can perform multi-point parking maneuvers and also offers support in leaving parallel parking spaces.

Another technology from Audi is the parking system plus with surround view cameras. Four small cameras – in the single-frame grille, at the rear and in the side mirror housings – record the vehicle’s immediate surroundings. The driver can call up a variety of views on the large onboard monitor, including a top-down virtual view. On corners or junctions with an obstructed view, the system can analyze cross-traffic otherwise invisible to the driver in front of or behind the vehicle."


To get a feel of that you can watch this video :


Hope you enjoyed this. Stay connected for more.

Thursday, January 17, 2013

Google Spanner : The Future Of NoSQL

Quite often, while working with Hbase, I used to feel how cool it would be to have a database that can replicate my data to datacenters across the world consistently. So that I can take the pleasure of global availability and geographic locality. And also which will save my data even in case of some catastrophe or natural disaster. Which supports general-purpose transactions, and provides a SQL-based query language. And which has features of an SQL database as well. But it was only untill recently I found out that it is not an imagination anymore.

I was sitting with a senior+friend of mine at a Cafe Coffee Day nearby and having a casual chat on BigData stuff. During the discussion he told me about something called as SPANNER.
(You might be wondering, why the heck I have emphasized on the word spanner so much. Believe me, you will do the same after reading this post).

After that meeting I almost forgot about that incident. Out of the blue, the word spanner flashed back to my mind 2 days ago and I started googling about spanner and the search led me to this Google research page, which just blew my mind. Google has already been working extensively on something,which they call as Spanner.

Spanner is a scalable, globally-distributed database designed, built, and deployed at Google. At the highest level of abstraction, it is a database that shards data across many sets of Paxos state machines in datacenters spread all over the world. Replication is used for global availability and geographic locality; clients automatically failover between replicas. Spanner automatically reshards data across machines as the amount of data or the number of servers changes, and it automatically migrates data across machines (even across datacenters) to balance load and in response to failures. Spanner is designed to scale up to millions of machines across hundreds of datacenters and trillions of rows. Applications can use Spanner for high availability,even in the face of wide-area natural disasters, by replicating their data within or even across continents.

We can think of Spanner as globally-distributed database that may spread across the continents covering the planet. Spanner provides several very interesting features :
1 : The replication configurations for data can be controlled dynamically by the applications in a fine grained manner.
2 : It gives us the ability to control which datacenters contain which data.
3 : To control read latency it gives application the ability to decide how far data is from its users etc etc.

But there are 2 things which really stand out : externally consistent reads and writes, and globally consistent reads across the database at a timestamp. Both these things are really difficult to implement in a distributed database. These features enable Spanner to support consistent backups, consistent MapReduce executions, and atomic schema updates, all at global scale, and even in the presence of ongoing transactions.

Few words on the Structure :

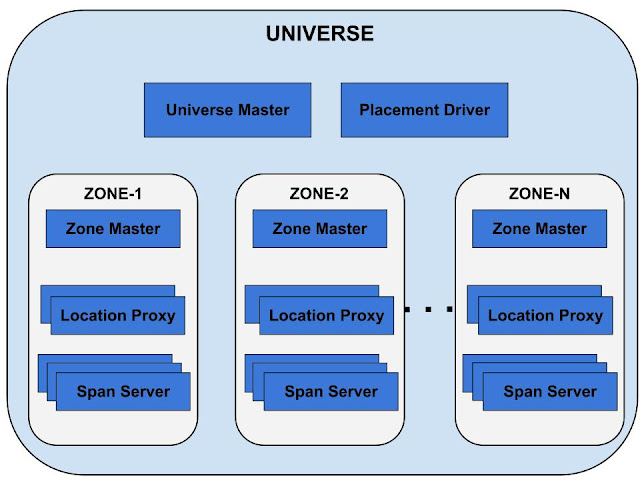
A Spanner deployment is called a universe. Spanner is organized as a set of zones, where each zone is somewhat like a Bigtable deployment. Zones can be added to or removed from a running system as new datacenters are brought into service and old ones are turned off. The set of zones is also the set of locations across which data can be replicated. The figure drawn below shows the Spanner server organization :


A zone has one zonemaster and between one hundred and several thousand spanservers. The former assigns data to spanservers; the latter serve data to clients. The per-zone location proxies are used by clients to locate the spanservers assigned to serve their data. The universe master and the placement driver are currently singletons. The universe master is primarily a console that displays status information about all the zones for interactive debugging. The placement driver handles automated movement of data across zones on the timescale of minutes. The placement driver periodically communicates with the spanservers to find data that needs to be moved, either to meet updated replication constraints or to balance load.

For a detailed info you can download the original paper (used as the reference) from here.

I hope you enjoyed reading this post and knowing about Spanner as much as I did. Don't forget to provide me your comments and/or suggestions. Thank you.

Wednesday, January 9, 2013

This is what 128GB of RAM looks like


Isn't it awesome?????


Premium Suite For Samsung Galaxy Note

If you are envious of your friends or colleagues, who are flaunting  their new Galaxy Note-II having the  awesome Jelly Bean, you don't have to do it anymore. Samsung is there to help you out. They have recently announced the Premium Suite Upgrade for the original Galaxy Note just like they had done for Galaxy S-III some days ago.

Although they haven't announced any exact date yet, it is expected to arrive sooner. For the most up to date info you can always visit the official link. This Premium Upgrade includes all of the latest features like Multi-Window etc along with the latest Android version, Jelly Bean. Here is a list of the cool features that are bundled with the upgrade.

1. Multi-Window : The Multi-Window feature allows us to do multiple tasks on the same screen simultaneously. It not only gives us a great level of comfort but also looks damn cool.

2. Popup Note / Video / Browser : Popup Note helps in writing down the notes just by pulling out S Pen or double tap the screen. Whereas Popup Video and Browser allow users to watch videos or surf internet while doing some other tasks on the single screen.

3. Photo Note / Photo Frame : Photo Note feature allow users to write notes on the pictures.

4. Easy Clip : Easy Clip enables to crop an image from any source screen to save or share with adding text. Users can also add select text using Easy Clip by drawing a single line on it.

5. Paper Artist : Paper Artist provides photo editing by adding various built-in editing effects.

6. Handwriting on S Planner/ Email : Users can write notes in their own handwriting in S Planner and even send handwritten notes through Email.

7. Enhanced S Note : Users can add Sketch effect for various photo effect and image filters with Color Picker in the S Pen.

Another cool thing about this upgrade is that it includes the latest Android 4.1(Jelly Bean)  with Project Butter that smoothens the overall performance of the UI and enhances the graphics along with the awesome Google Now. Along with this, rumors are floating around that the new Premium Suite upgrade of Samsung Galaxy Note will also have the Air View. Although I am not 100% sure of it right now, i'll keep you updated as I get any news.

How to work with Avro data using Apache Spark(Spark SQL API)

We all know how cool Spark is when it comes to fast, general-purpose cluster computing. Apart from the core APIs Spark also provides a rich ...